One on One Events Guide
Overview
The Events feature allows users to create, manage, and track various types of meetings and appointments. Administrators can view and create events for all users, while regular users can only view and manage their own events.
User Permissions
- Admin Users: Can view, create, and manage events for all users in the system
- Regular Users: Can only view and manage their own events
Getting Started
Accessing Events
- Navigate to the Events section from the main dashboard
- You'll see a list of existing events displayed in card format
- Use the search bar to find specific users or events (admin only)
- Click CREATE button to start creating a new event
Event Types
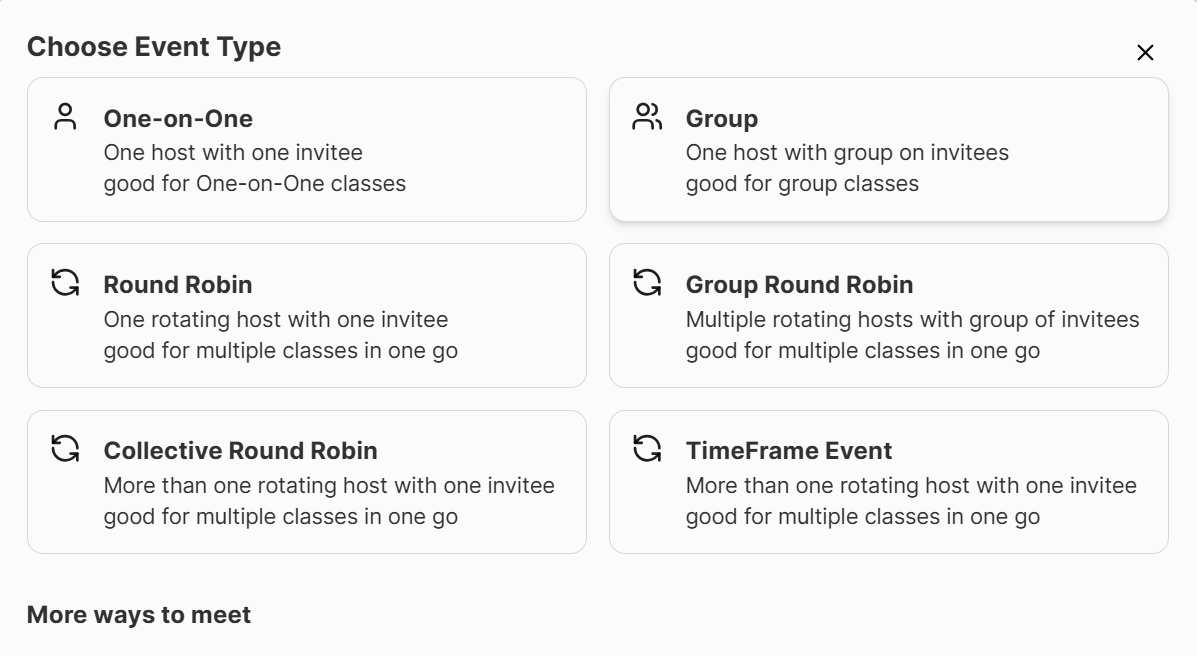
When creating a new event, you'll be presented with different event types:
1. One-on-One
- Description: One host with one invitee
- Best for: Personal consultations, interviews, coaching sessions
- Features: Direct scheduling between two participants
2. Group
- Description: One host with multiple invitees
- Best for: Team meetings, group classes, workshops
- Features: Multiple participants can join the same session
3. Round Robin
- Description: One rotating host with one invitee
- Best for: Sales calls, support sessions where multiple team members can handle requests
- Features: Distributes meetings among available team members
4. Group Round Robin
- Description: Multiple rotating hosts with group of invitees
- Best for: Team-based consultations, group support sessions
- Features: Combines group meetings with rotating host assignment
5. Collective Round Robin
- Description: More than one rotating host with one invitee
- Best for: Complex consultations requiring multiple experts
- Features: Multiple hosts can participate in the same meeting
6. TimeFrame Event
- Description: More than one rotating host with one invitee within specific time frames
- Best for: Time-sensitive meetings, scheduled rotations
- Features: Hosts rotate based on predefined time slots
Step-by-Step Event Creation Process
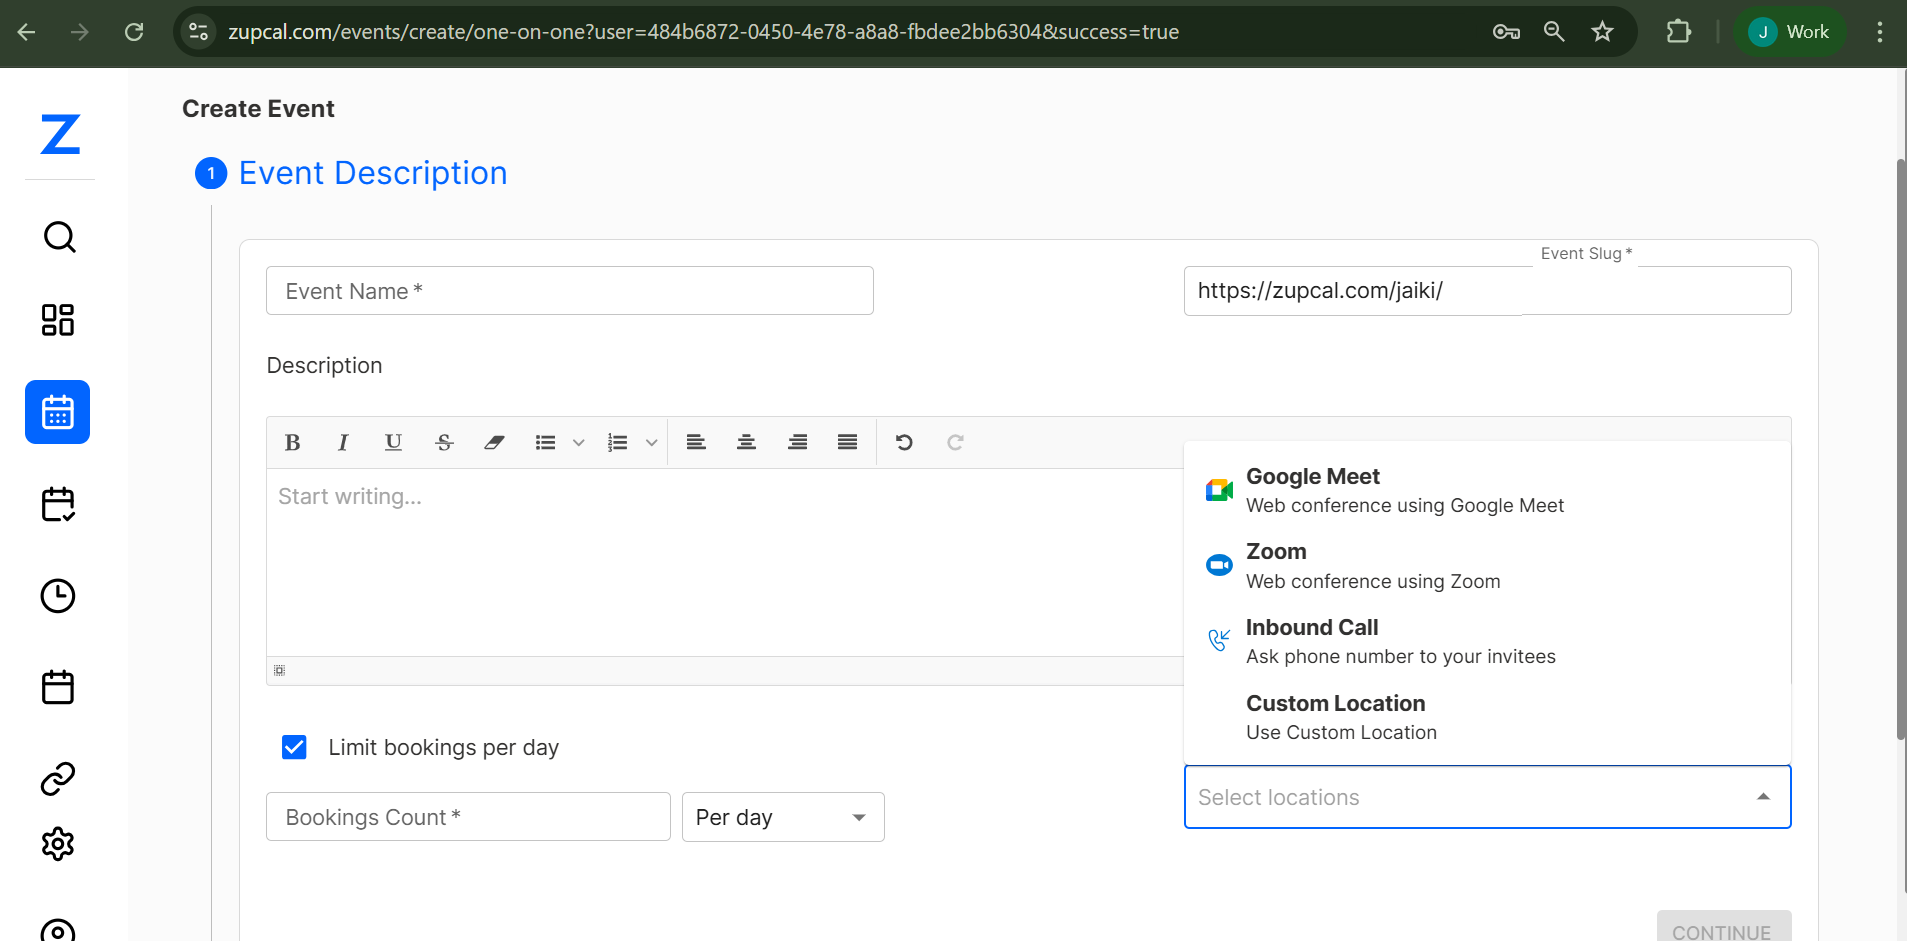
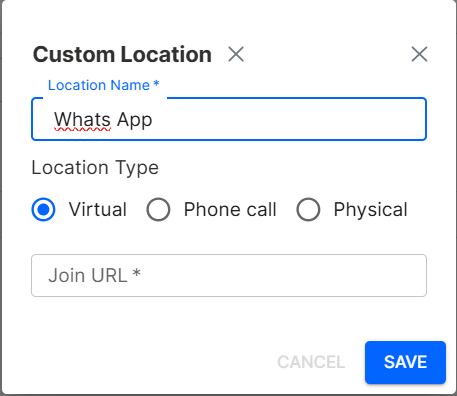
Select or specify the event location in Custom Locations
Step 1: Event Description
- Event Name: Enter a descriptive name for your event
- Description: Use the rich text editor to provide detailed information about the event
- Use formatting tools (bold, italic, underline, strikethrough)
- Add lists, links, and other formatting as needed
- Event Slug: Auto-generated URL slug (customizable)
- Location: Select or specify the event location
- Limit bookings per day: Optional checkbox to restrict daily bookings
- Click CONTINUE to proceed
Step 2: Availability
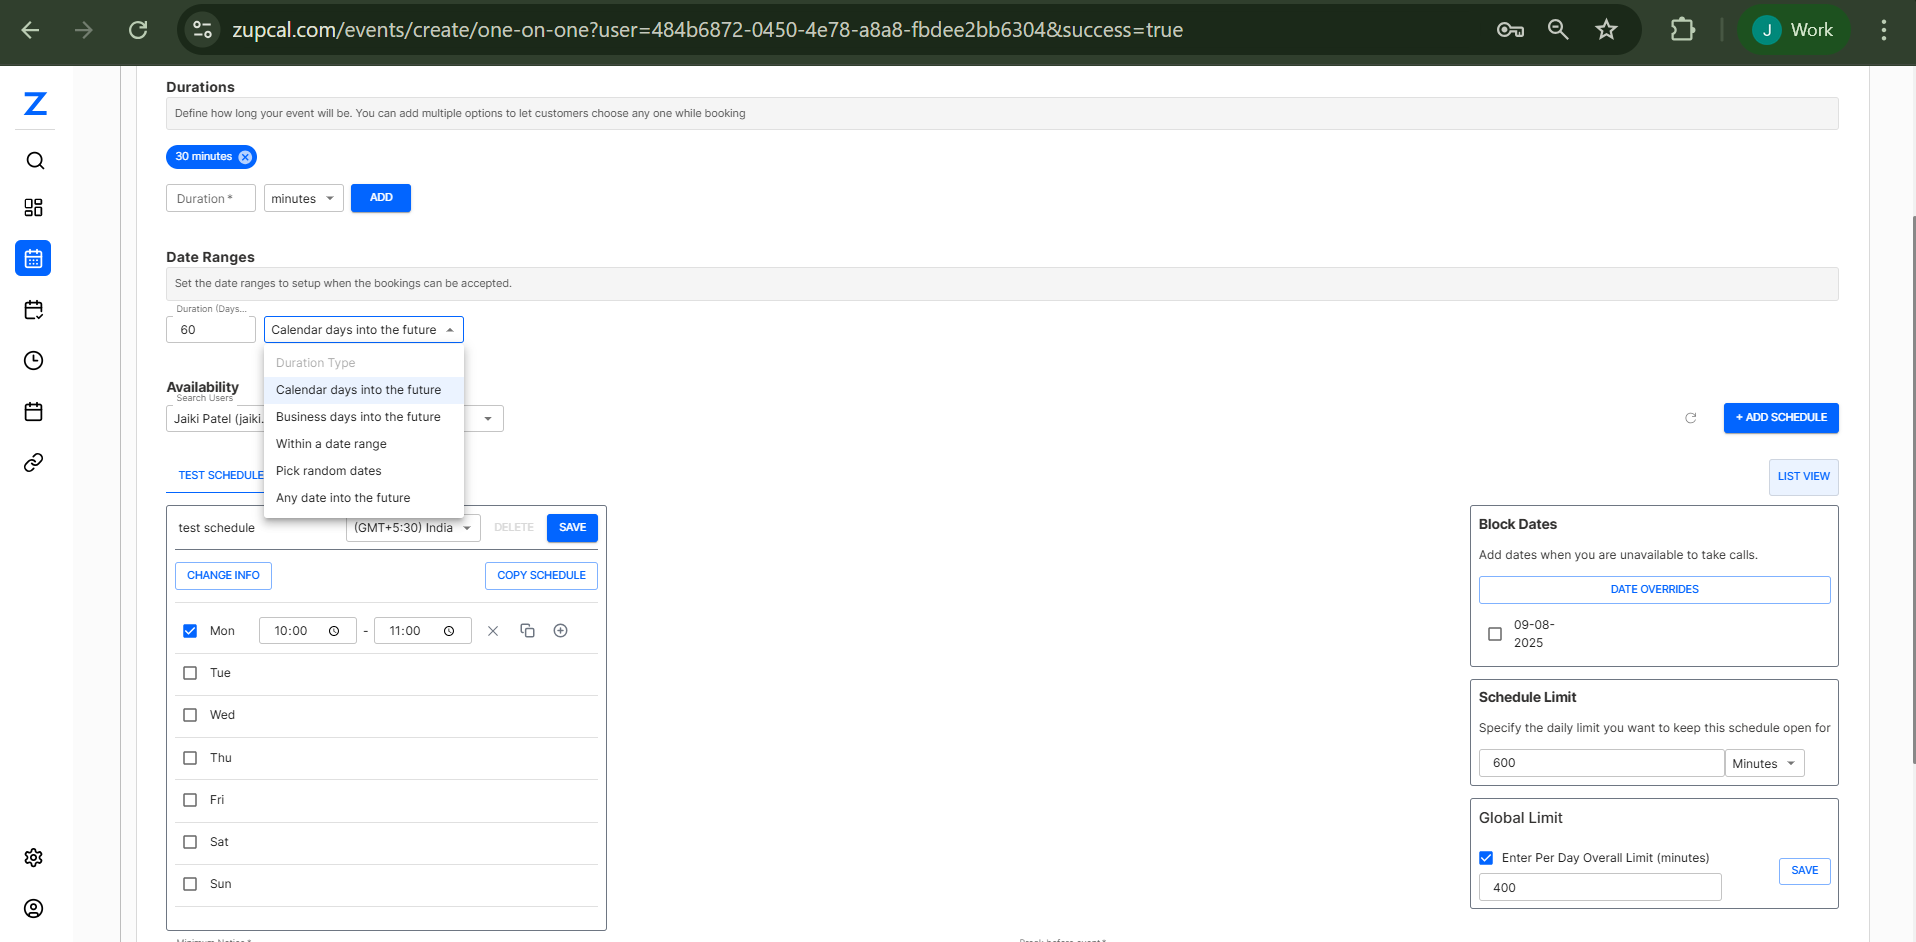

- Durations: Set how long your event will last
- Choose from preset durations or set custom duration
- Select time units (minutes/hours)
- Date Ranges:
- Set how far in advance people can book
- Configure calendar days into the future
- Availability Schedule:
- Select your timezone
- Choose available days of the week (Mon-Sun)
- Set specific time slots for each day
- Configure buffer times between meetings
- Block Dates: Add specific dates when you're unavailable
- Schedule Limits: Set daily booking limits
- Global Limits: Configure overall booking restrictions
- Click CONTINUE to proceed
Step 3: Invitee Questions
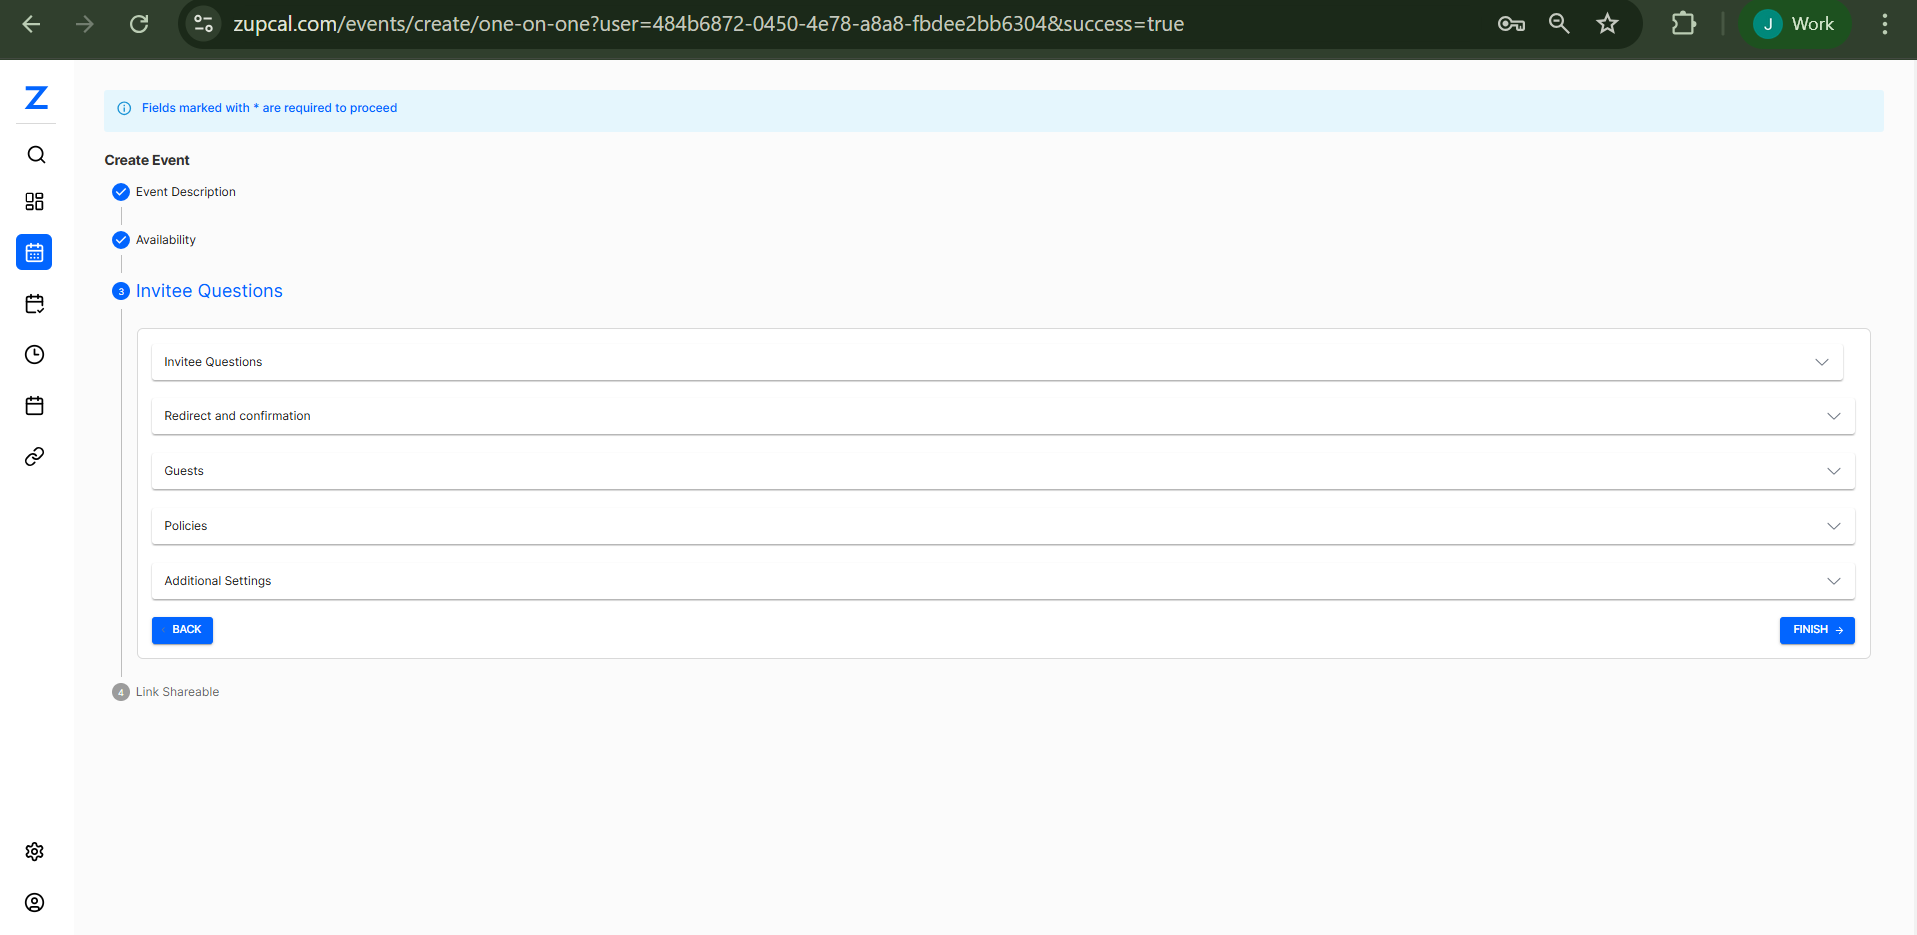
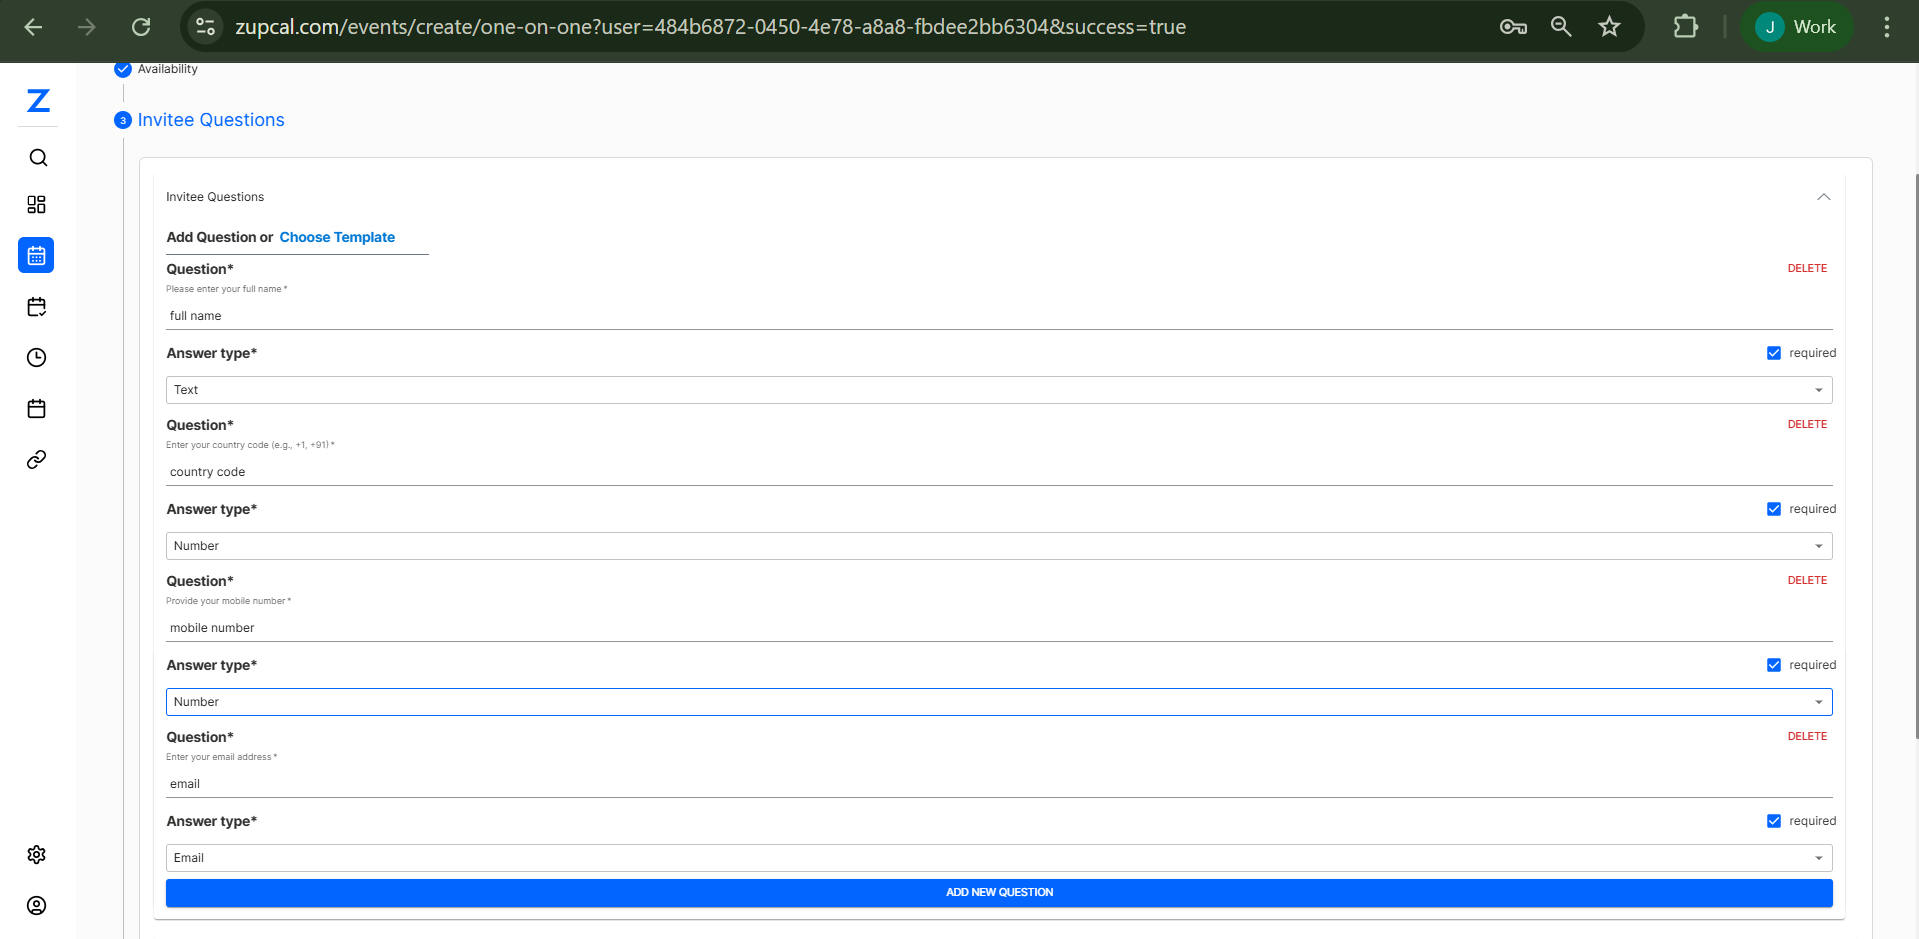
- Invitee Questions: Add custom questions for attendees
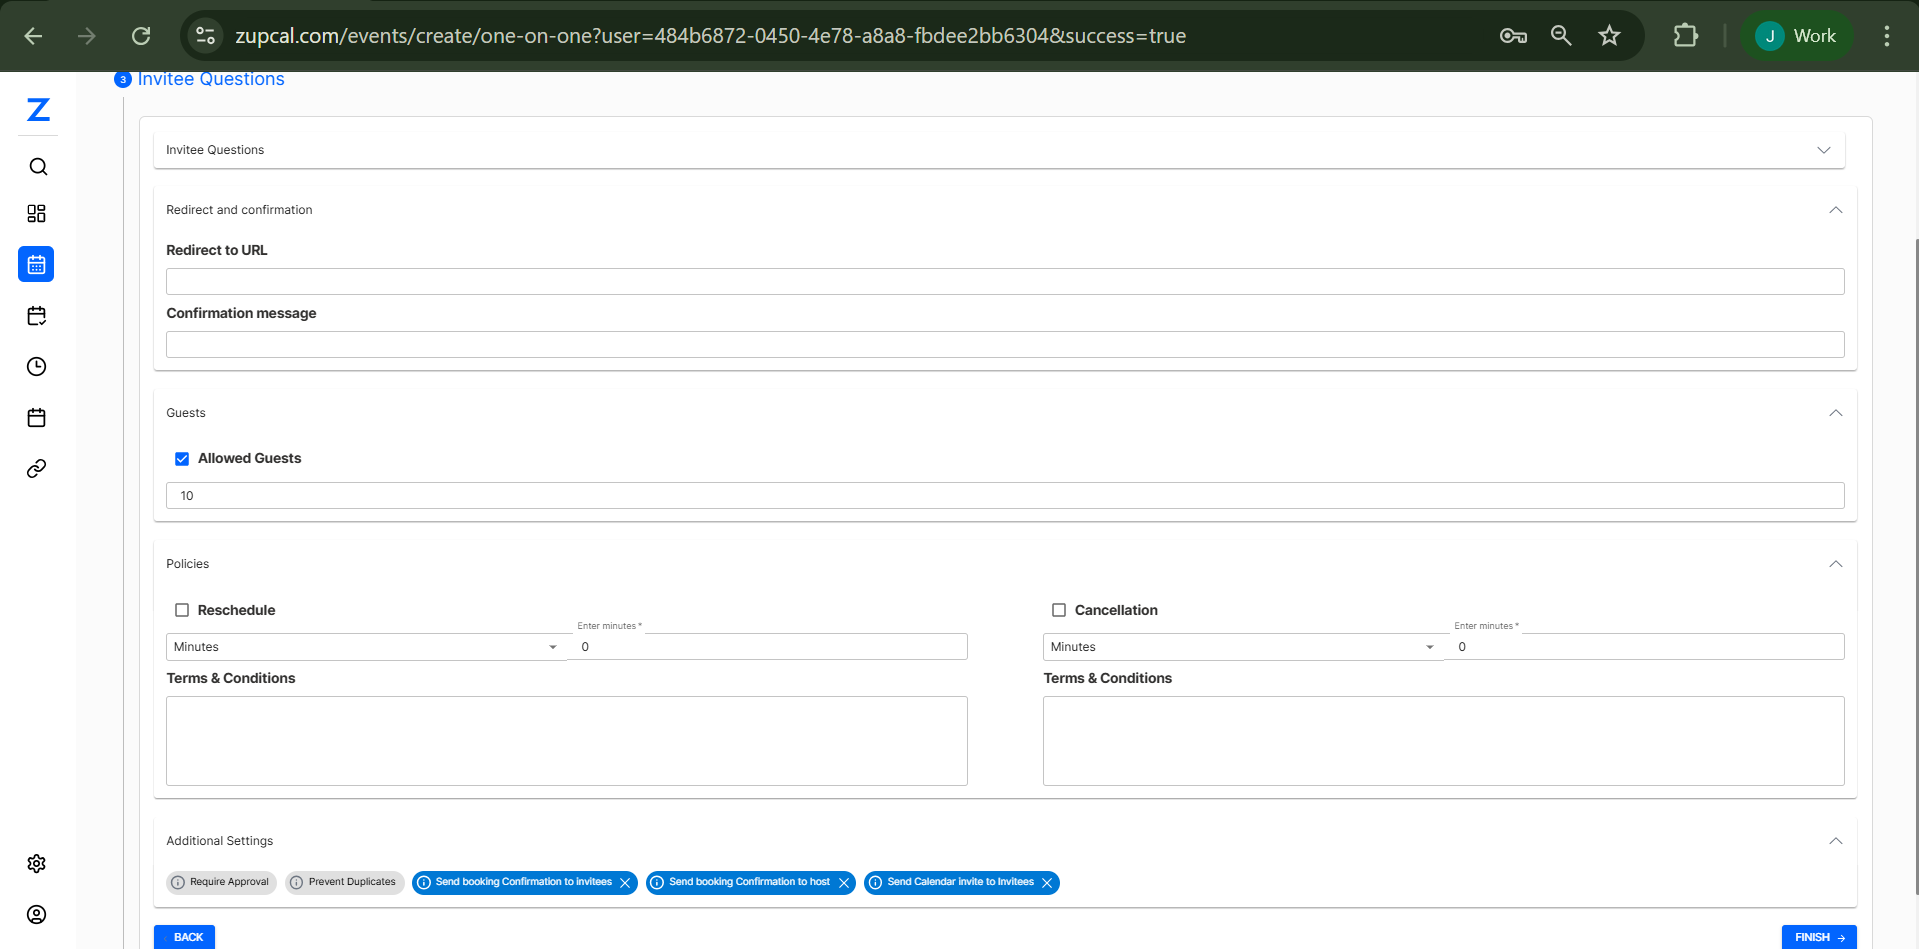
- Redirect Preferences: Set where invitees go after booking
- Redirect to URL: Specify custom redirect URLs
- Confirmation Message: Customize the booking confirmation message
Step 4: Guest Management
- Allowed Guests: Set maximum number of additional guests
- Guest Policies: Define terms and conditions for guests
Step 5: Policies & Settings
- Reschedule Policy:
- Enable/disable rescheduling
- Set time limits for rescheduling
- Cancellation Policy:
- Enable/disable cancellations
- Set cancellation time limits
- Terms & Conditions: Add legal terms for both reschedule and cancellation
- Additional Settings: Configure advanced options like:
- Secret Meetings
- Private Calendars
- Meeting Confirmation Settings
- Send Meeting Confirmation Links
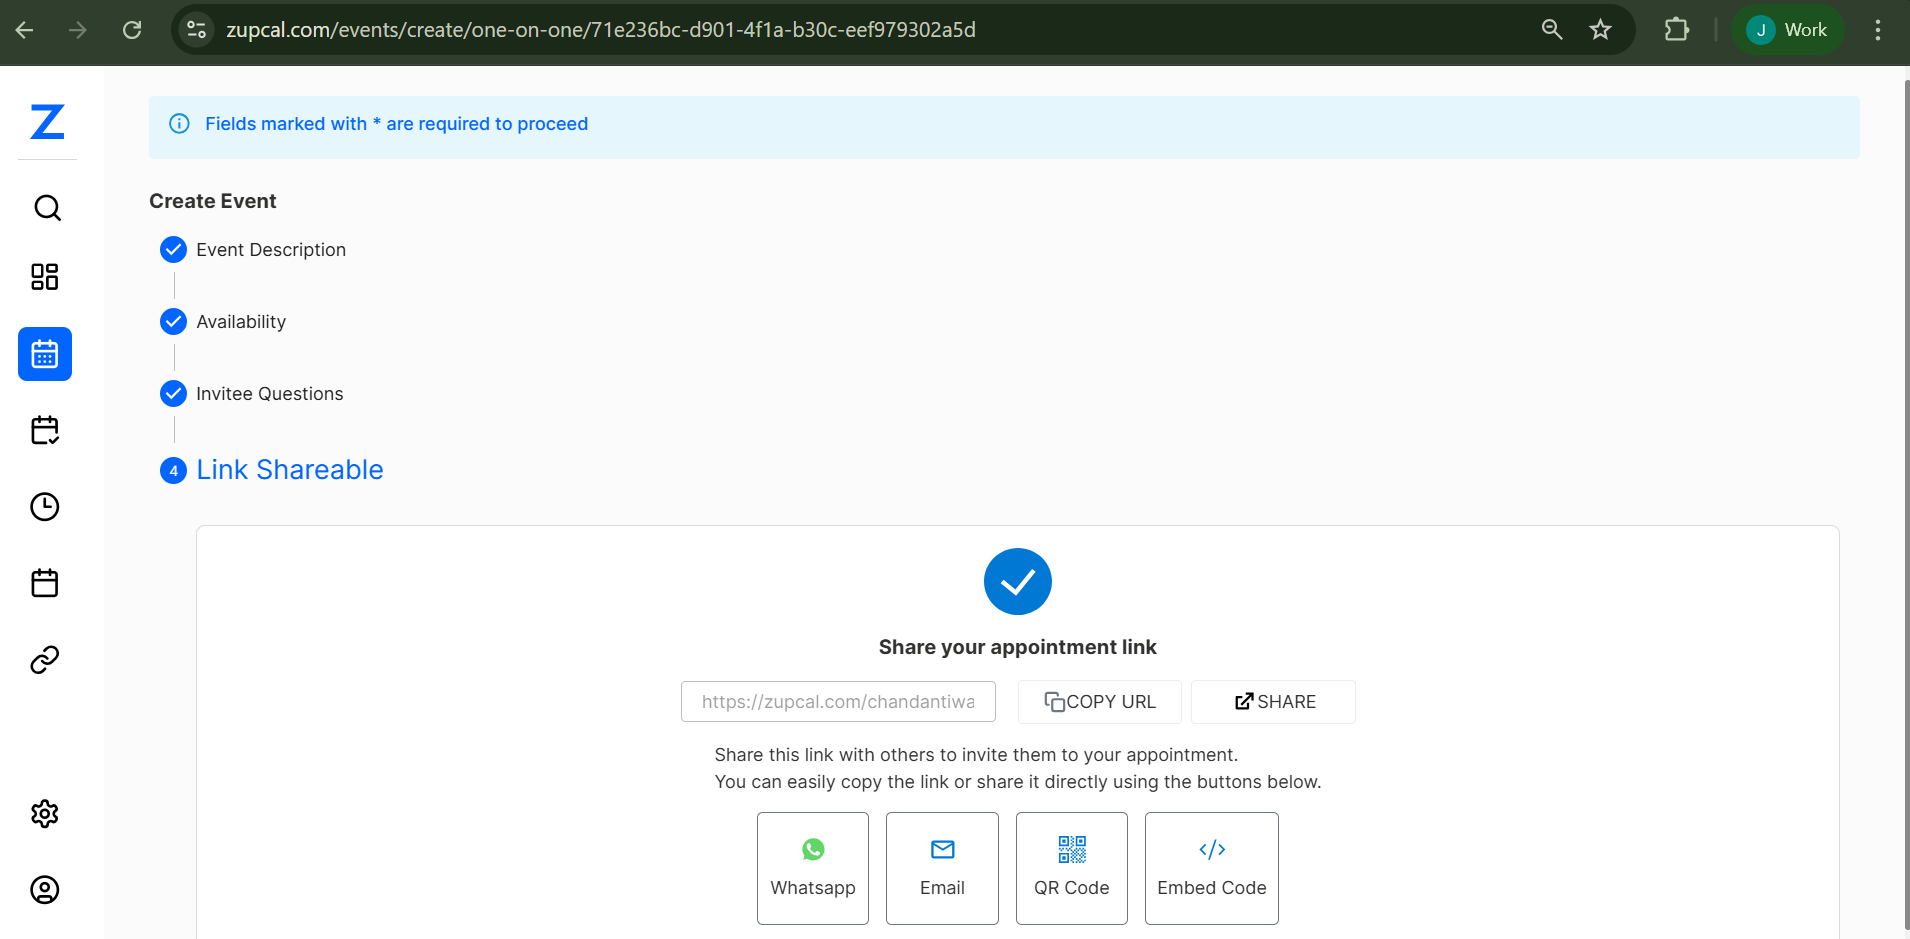
Step 6: Finalization
- Review all settings
- Click FINISH to create the event
- Your event will now appear in the events listing
Managing Existing Events
Event Card Actions
Each event card displays:
- Event name and description
- Event type tags
- View Booking Page: See the public booking interface
- Copy Details: Duplicate event settings to create similar events
- Edit: Modify event settings (available via three-dot menu)
- Copy: Create a duplicate of the event
- QR: Generate QR code for easy sharing
- Delete: Remove the event permanently
- Deactivate: Temporarily disable the event

Event Status Management
- Active Events: Currently available for booking
- Inactive Events: Temporarily disabled
- Archived Events: Permanently disabled but kept for records
Advanced Features
Schedule Management
- Buffer Times: Set time between meetings to avoid back-to-back scheduling
- Minimum Notice: Require advance booking time
- Date Limits: Control how far in advance bookings can be made
Integration Options
- Calendar Sync: Connect with external calendars
- Confirmation Emails: Automated email notifications
- Reminder Systems: Set up automatic reminders
Best Practices
Event Naming
- Use clear, descriptive names
- Include duration or type in the name for clarity
- Example: "30-min Strategy Consultation" or "Weekly Team Standup"
Description Writing
- Clearly explain what the meeting will cover
- Include any preparation requirements
- Set expectations for attendees
- Add contact information if needed
Availability Planning
- Consider time zones for global attendees
- Leave buffer time between meetings
- Block out personal time and breaks
- Regular review and update of availability
Guest Management
- Set appropriate guest limits
- Clearly communicate guest policies
- Consider security requirements for sensitive meetings
Troubleshooting
Common Issues
- Events not appearing: Check if the event is activated
- Booking conflicts: Review availability settings and calendar integration
- Guest access issues: Verify guest policy settings
- Timezone confusion: Ensure correct timezone is selected in availability settings
Support Resources
- Check event status in the events dashboard
- Review booking page for public view
- Verify all required fields are completed
- Test booking flow as an invitee
🧠 Frequently Asked Questions (FAQ)
1. Can I create multiple event types at once?
No, each event type must be created separately. However, you can copy details from existing events to speed up the process.
2. What's the difference between Group and Group Round Robin?
Group events have one fixed host. Group Round Robin rotates bookings between multiple hosts for shared group availability.
3. Can I change the event type after creation?
No, the event type is locked after creation. You’ll need to create a new event with the desired type.
4. How do buffer times work?
Buffer times add a gap before and/or after meetings to avoid back-to-back bookings and allow time to prepare or wrap up.
5. Can I set different availability for different events?
Yes, every event can have its own custom schedule, including duration, availability window, and booking rules.
6. What happens if I'm unavailable during a booked time?
You should either block those times in your availability or deactivate the event temporarily.
7. Can guests reschedule or cancel meetings?
It depends on the reschedule/cancel settings configured per event. You can allow or restrict these actions.
8. How do invitee questions work?
Custom questions are shown during booking. Invitee responses are stored and shared with you in the meeting details.
9. Can I limit the number of bookings per person?
Yes, you can define global and daily booking limits to control overbooking.
10. How do I share my booking page?
Use the "View Booking Page" link or generate a QR code from the event card for easy sharing.
11. Can I integrate with external calendars?
Yes, calendar integration is supported to sync availability and prevent double bookings.
12. What happens to existing bookings if I deactivate an event?
All existing bookings remain active, but no new bookings can be made until the event is reactivated.
13. How can I manage events for other users?
Admins can use the search bar to find and manage event settings for any user.
14. Can I see all bookings across all users?
Yes, admins have global visibility to view and manage bookings for all users in the organization.
15. How do I help users troubleshoot their events?
Admins can access and adjust event settings for any user to resolve issues or walk them through changes.