Schedules
Welcome to Schedules
Effortlessly manage user availability for booking appointments and events.
📅 Managing Schedules
The Schedules feature allows you to set availability for users. Administrators can manage all user schedules, while regular users can only manage their own availability.
👥 User Permissions
Administrator Access:
- View and manage all user schedules
- Add new schedules for any user
- Modify existing schedules for any user
- Delete schedules for any user
Regular User Access:
- View and manage only their own schedules
- Add personal schedules
- Modify their own existing schedules
- Delete their own schedules
🚀 Steps to Access Schedules
-
Navigate to Settings:
Click on Settings from the main menu. -
Select Schedules Tab:
Click on the SCHEDULES tab. -
Choose User (Admin Only):
- Use the dropdown to select which user's schedule to manage
- Format:
Name (email@domain.com)
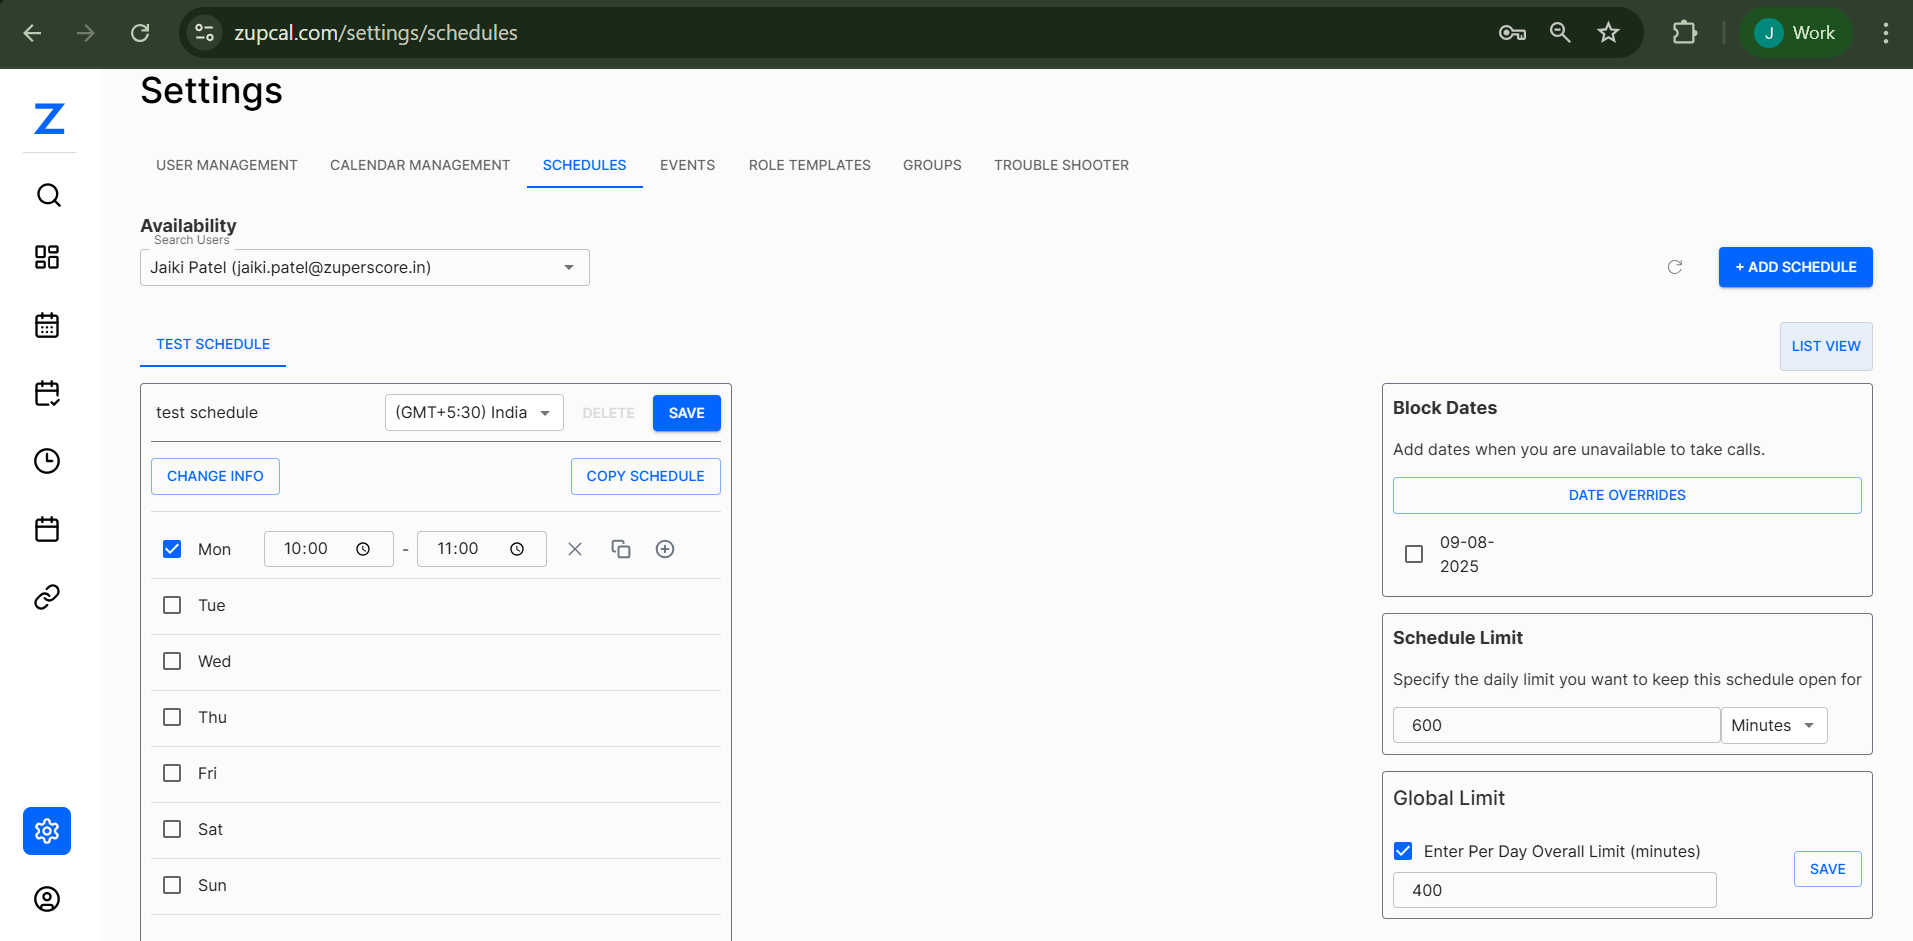
➕ Creating a New Schedule
Follow these steps to create a schedule from scratch.
📝 Schedule Creation Steps
-
Click Add Schedule:
Click the + ADD SCHEDULE button (top right). -
Configure Basic Settings:
- Schedule Name: Enter a descriptive name
- Timezone: Select appropriate timezone from dropdown
- Click SAVE to preserve settings
-
Set Weekly Availability:
Configure availability for each day:- Check the box to enable the day
- Set Start Time (e.g., 10:00)
- Set End Time (e.g., 11:00)
- Repeat for all required days (Mon-Sun)
-
Save Your Schedule:
Click SAVE to finalize the schedule.
💡 Use the COPY SCHEDULE feature to duplicate existing schedules and modify as needed.
🚫 Block Dates Management
Block specific dates when you're unavailable for appointments.
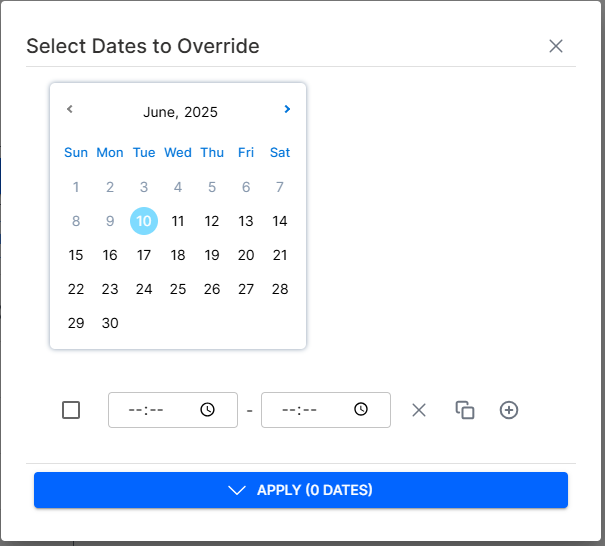
🗓️ Steps to Block Dates
-
Access Block Dates:
In the right sidebar, find Block Dates section. -
Click Date Overrides:
Click the DATE OVERRIDES button. -
Select Dates to Block:
- A calendar popup will appear
- Click on dates you want to block (multiple selection supported)
- Selected dates will be highlighted
-
Apply Blocked Dates:
Click APPLY (X DATES) to confirm your selections. -
Manage Existing Blocks:
- View blocked dates in format
09-08-2025 - Uncheck dates to remove blocks
- Use bulk selection for multiple dates
- View blocked dates in format
⏱️ Setting Schedule Limits
Control booking duration and prevent overbooking.
📊 Limit Configuration Steps
-
Daily Schedule Limit:
- Enter maximum minutes per day (e.g., 600 minutes = 10 hours)
- This prevents overbooking on individual days
-
Global Limit:
- Check Enter Per Day Overall Limit
- Set maximum total minutes across all bookings
- Enter value in minutes (e.g., 400 minutes)
-
Save Settings:
Click SAVE to apply limit configurations.
⚠️ Important: These limits help maintain work-life balance and prevent scheduling conflicts.
✏️ Modifying Existing Schedules
Update schedules to reflect changing availability.
🔄 Modification Steps
-
Change Schedule Information:
- Click CHANGE INFO button
- Modify schedule name or timezone
- Save changes
-
Update Availability:
- Check/uncheck days as needed
- Adjust time slots using time pickers
- Click SAVE to apply changes
-
Copy Schedule:
- Click COPY SCHEDULE button
- Create duplicate with modified settings
- Useful for creating similar schedules
🗑️ Deleting Schedules
Remove schedules that are no longer needed.
❌ Deletion Steps
-
Click Delete Button:
Click the DELETE button next to the schedule. -
Confirm Deletion:
A confirmation prompt will appear: "Are you sure to delete, it cannot be undone" -
Proceed or Cancel:
- Confirm deletion to permanently remove the schedule
- Or cancel to keep the schedule
⚠️ Warning: Schedule deletion is permanent and cannot be undone. Ensure you have backups if needed.
🔗 Schedule Integration
Learn how schedules work with other zupcal features.
📅 Event Creation
- Schedules define available time slots for new events
- Event creators can only select times within schedule boundaries
- Multiple schedules can be combined for complex availability
🎯 Booking Process
- Customer requests are validated against active schedules
- Blocked dates prevent booking attempts
- Schedule limits enforce maximum booking constraints
- Real-time availability checking prevents conflicts
💡 Best Practices
Schedule Naming:
- Use descriptive names (e.g., "Office Hours", "Weekend Support")
- Include user names for admin-managed schedules
- Consider including timezone for clarity
Time Management:
- Set realistic buffer times between appointments
- Account for preparation and cleanup time
- Consider different schedules for different services
Block Date Management:
- Regularly update for holidays and time off
- Consider team schedules when blocking dates
- Plan ahead for seasonal availability changes
🧠 Frequently Asked Questions (FAQ)
Can users have multiple schedules?
What happens to existing bookings when I modify a schedule?
Can I temporarily disable a schedule?
How do I bulk update schedules for multiple users?
What's the difference between blocking dates and unchecking days?
Why can't customers book certain time slots that appear available?
How far in advance can I set blocked dates?
What happens if I delete a schedule that's being used by active events?
Can customers see why certain dates are unavailable?
How do timezone changes affect existing schedules?
🚀 Getting Started with Schedule Management
Once you've set up your schedules, explore related features:
- 📅 Event Creation and Management
- 🎯 Booking and Appointment Handling
- 👥 User Management and Permissions
- 📊 Analytics and Reporting
🛠 Additional Notes
- Use consistent timezone settings across your organization
- Regularly review and update schedules for accuracy
- Test booking flows after making schedule changes
💡 Tip: Create template schedules for common availability patterns and copy them for new users to save time.